
If you want to boost your car’s sound system and enjoy clearer, more powerful music, adding an amp to your car stereo is the way to go. You might think it’s complicated or expensive, but it doesn’t have to be.
This guide will show you exactly how to add an amplifier to your car stereo, step by step. By the end, you’ll know how to get richer sound without breaking the bank or spending hours in your garage. Ready to transform your driving experience with better sound?
Let’s dive in!

Credit: www.youtube.com
Choosing The Right Amplifier
Choosing the right amplifier for your car stereo is key to better sound. An amp boosts audio signals. It helps speakers play louder and clearer. Picking the right one avoids damage and sound problems. Think about power, size, and how you use your car stereo.
Types Of Car Amplifiers
There are three main types of car amplifiers. Class A/B amps are common and sound good. They work well with most speakers. Class D amps are smaller and more efficient. They use less power and produce less heat. Mono amps are for subwoofers only. They give strong bass by focusing on one channel.
Matching Amp Power To Speakers
Check your speaker’s power rating before choosing an amp. The amplifier’s power should match the speaker’s capacity. Too much power can damage speakers. Too little power makes sound weak and unclear. Use RMS power ratings, not peak power. RMS shows the real continuous power an amp can deliver.
Budget Considerations
Set a budget for your amplifier purchase. Good amps come in many price ranges. More expensive amps often offer better sound and features. Look for amps that fit your needs and wallet. Avoid very cheap amps; they may cause problems later. Balance price with quality to get the best value.
Gathering Essential Tools And Materials
Before installing an amp to your car stereo, gather all the tools and materials. Having everything ready makes the process smooth and safe. It saves time and prevents frustration during installation.
Proper tools help you connect wires securely and mount the amp correctly. Using the right wiring kits ensures good sound quality and protects your car’s electrical system.
Required Installation Tools
You need a few basic tools to install a car amplifier. A wire stripper helps remove insulation from wires cleanly. A screwdriver set lets you remove and fasten screws easily. A drill might be necessary to mount the amp or run wires through tight spots.
Crimping pliers are useful for attaching connectors to wires firmly. A multimeter checks voltage and continuity to avoid wiring mistakes. Electrical tape or heat shrink tubing protects wire connections from short circuits.
Wiring Kits And Accessories
A complete wiring kit includes power cables, ground wires, and RCA cables for audio signals. The power cable connects the amp to the car battery. Choose the right gauge size to handle the amplifier’s power needs.
Ground wires link the amp to the car chassis for stable power flow. RCA cables transmit audio signals from the head unit to the amp. Speaker wires connect the amplifier to your car speakers.
Fuse holders and fuses protect your amplifier and vehicle from electrical damage. Make sure the fuse rating matches your amp’s power requirements. Cable ties help keep wires neat and prevent tangling inside the car.
Preparing Your Car Stereo System
Preparing your car stereo system is the first step to adding an amplifier. This process helps protect your equipment and makes installation easier. You need to work safely and carefully to avoid damage. Follow these simple steps to get ready.
Disconnecting The Battery
Start by disconnecting the negative terminal of your car battery. This prevents electrical shocks and short circuits. Use a wrench to loosen the nut on the battery clamp. Remove the clamp and keep it away from the battery. This step is very important for your safety.
Removing The Stereo Head Unit
Next, remove the stereo head unit from the dashboard. Use the proper tools like a panel remover or screwdriver. Gently pry off the trim around the stereo. Unscrew the mounting screws and pull the unit out slowly. Unplug all cables connected to the back of the stereo. Keep the screws and parts safe for reassembly.
Wiring The Amplifier
Wiring the amplifier is a key step to boost your car stereo’s sound. It links the power, audio signals, and control signals to the amp. Proper wiring ensures the amp works safely and delivers clear sound. Follow each step carefully to avoid damage and enjoy better audio.
Running Power And Ground Wires
Start by connecting the power wire from the car battery to the amplifier. Use a thick wire to handle the current. Place a fuse near the battery to protect the system. Next, connect the ground wire from the amp to a clean metal part of the car’s body. This wire stops electrical noise and keeps the amp stable.
Connecting Rca Cables
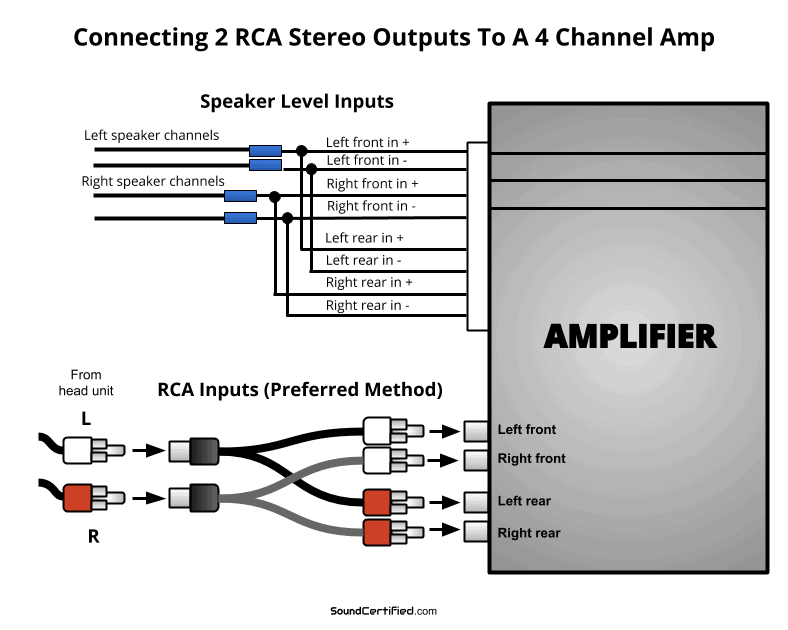
RCA cables carry the audio signal from the stereo to the amplifier. Plug the cables into the stereo’s RCA output jacks. Match the colors—red for right, white for left. Run the cables carefully to the amplifier, avoiding power wires to reduce noise. Secure the cables to prevent damage while driving.
Installing The Remote Turn-on Wire
The remote turn-on wire tells the amplifier when to turn on and off. Connect it from the stereo’s remote output to the amplifier’s remote input. This wire uses low voltage to switch the amp on with the stereo. Make sure the connection is tight to avoid power issues.
Mounting The Amplifier
Mounting the amplifier is a key step in upgrading your car stereo. It affects sound quality and safety. Proper placement and secure fixing help the amp work well and last longer.
Choosing The Best Location
Select a spot with good airflow to keep the amp cool. Avoid places near heat sources like the engine or exhaust. Choose a dry area to prevent damage from moisture. Common spots include under seats, in the trunk, or behind panels. Make sure the location allows easy access for wiring and adjustments.
Securing The Amp Safely
Use strong brackets or a mounting kit to fix the amp firmly. Avoid loose or shaky mounts that can cause noise or damage. Tighten screws and bolts properly, but do not overtighten. Place the amp on a flat surface to keep it stable. Secure wires neatly to prevent wear and short circuits. Safety first—this prevents accidents and keeps your sound clear.

Credit: www.amazon.com
Connecting Speakers And Subwoofers
Connecting speakers and subwoofers to your car amplifier is a key step. It lets your audio system deliver clear, powerful sound. Proper wiring ensures the best performance and prevents damage. Follow simple steps to connect everything safely and correctly.
Speaker Wire Connections
Use good quality speaker wire for strong connections. Strip about half an inch of insulation from each wire end. Connect the positive wire to the amplifier’s positive terminal. Match the negative wire to the amplifier’s negative terminal. Double-check that wires do not touch each other. Loose or crossed wires can cause shorts and damage. Secure the wires tightly to avoid poor contact.
Configuring Subwoofer Wiring
Subwoofers need special wiring to handle low bass sounds. Check if your subwoofer is single or dual voice coil. For single voice coil, connect positive and negative wires to the amp’s subwoofer terminals. For dual voice coil, wire coils in series or parallel based on your amp’s load rating. Series wiring increases impedance, parallel lowers it. Correct impedance keeps the amplifier safe and efficient. Use thick wire to handle high power without loss.
Testing And Tuning The System
Testing and tuning the amplifier system is a key step. It ensures your car stereo sounds clear and powerful. Careful checks help avoid damage to your speakers or amplifier. This process also lets you get the best sound quality from your setup.
Powering On And Initial Checks
Turn on your car stereo and amplifier carefully. Listen for any strange noises like buzzing or crackling. Check that all wires and connections are secure. Look for any warning lights on the amplifier. Make sure the amplifier does not get too hot quickly.
Test the system at low volume first. This protects the speakers and helps spot problems early. If everything sounds normal, you can slowly increase the volume. Stop immediately if you hear distortion or odd sounds.
Adjusting Gain And Frequency Settings
Set the amplifier gain to match your stereo’s output. Start with a low gain to avoid distortion. Gradually raise it until the sound is clear and loud. Avoid setting gain too high. It can cause sound damage and strain your system.
Adjust frequency settings to improve sound balance. Use the bass and treble controls on the amp. Tune the settings to your liking and room acoustics. Test with different music styles for best results. Small changes can make a big difference in sound quality.
Credit: soundcertified.com
Safety Tips And Troubleshooting
Installing an amplifier in your car stereo system can improve sound quality greatly. Safety is important during installation to avoid damage or injury. Troubleshooting helps solve common problems fast. Follow simple safety tips to protect yourself and your equipment.
Avoiding Common Installation Mistakes
Start by disconnecting the car battery before any work. It prevents electric shock and short circuits. Use the right tools for each step. Avoid using damaged or old wiring. Keep cables away from sharp edges and moving parts. Secure all connections tightly to prevent loose wires. Check the amplifier’s manual for specific instructions. Incorrect wiring can cause the amp not to work or damage the car’s electrical system.
Handling Electrical Issues
Test all connections with a multimeter before powering the amp. Confirm correct voltage and ground connections. If the amp does not turn on, check the fuse first. Replace blown fuses with the correct rating only. Listen for strange sounds or heat from the amplifier. These signs may mean a wiring problem or overload. Avoid touching wires while the system is live. Use insulated tools and wear gloves if possible. If unsure about any electrical step, ask a professional for help.
Frequently Asked Questions
What Tools Are Needed To Add An Amp To A Car Stereo?
You need wire strippers, screwdrivers, a drill, and a multimeter. Also, get amplifier wiring kits and mounting hardware for easy installation. These tools ensure a safe and professional setup.
How Do I Connect The Amp To The Car Stereo?
Connect the amp’s input to the stereo’s RCA output jacks. Use a remote turn-on wire to power the amp when the stereo is on. Ensure all connections are secure to avoid signal loss or noise.
Where Should I Mount The Amplifier In My Car?
Mount the amplifier in a dry, ventilated area like under a seat or in the trunk. Avoid places with excessive heat or moisture. Proper ventilation prevents overheating and extends amp life.
Can I Add An Amp Without Changing The Car Stereo?
Yes, you can add an amp by tapping into the factory stereo’s speaker wires. Use a line output converter for a clean signal. This method avoids replacing the head unit.
Conclusion
Adding an amp to your car stereo can greatly improve sound quality. Follow the steps carefully to avoid mistakes. Choose the right amp for your system and space. Connect all wires securely for the best performance. Test your setup before finalizing the installation.
Enjoy clearer and louder music on every drive. Taking your time helps you get the best results. Simple upgrades like this make a big difference. Ready to hear your favorite songs in a new way?